Build a child’s bookstand
One of my favorite childhood memories was going to the library with my mom. With all those adventures in the pages of books that lined the shelves, I fell in love with reading.
I know that you and your children love it, too, so why don’t you try building this nifty child’s bookstand with your children? It’s a great way to spend time with your children and a beautiful way to display their favorite books.
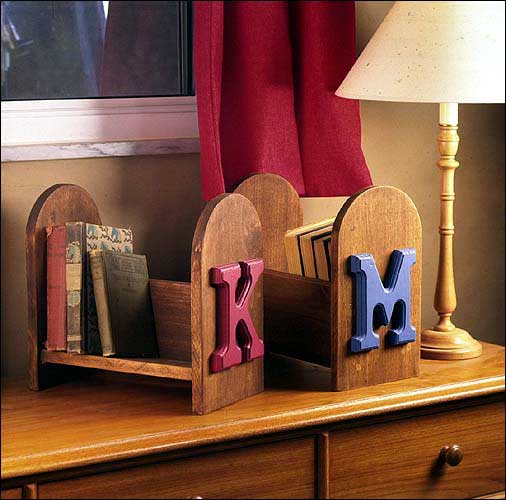
Try building a child's bookstand. It's a good way to spend time with your children and a beautiful way to display their favorite books.
Shari and I love projects that include children; just be careful and teach your children about shop safety.
Materials:
Circular saw or table saw
Jigsaw with a scroll blade
Compass
Pencil
Finish sander/sandpaper
Drill/drill bits
4d finish nails
Wood putty
Carpenters glue
Interior paint/polyurethane
Step 1: Mark your place
To start you will be marking the side pieces of the bookshelves. I chose poplar for my lumber because I stained the shelf once it was assembled, and poplar can be nicely stained or painted.
Use a circular saw with a cutting guide or a table saw to cut two pieces that measure 14 inches by 10 inches. For safety’s sake always read the manufacturer’s directions for your power tools.
Once the pieces are cut, lay the boards flat and find the center of the width of the boards (5 inches). Mark the center at the top of both boards. Place the compass with the point resting on the pencil mark and spread the compass until the pencil is on the edge of the board.
From the top pencil mark measure down 5 inches and make another pencil mark. Set the compass point at this mark and draw an arch that touches the top pencil mark and curves out to each edge of the board.
Cut out the curve using a jigsaw with a scroll blade, which has many fine teeth that make a nice clean cut and help cut curves and delicate details. I always cut leaving a little pencil mark and make my final finished look using a finish sander and sandpaper. Sand all edges smooth starting with a 150-grit paper and finishing with a 220-grit paper.
Step 2: Between the lines
Now you need to build the shelf, so start by cutting two boards 12 inches by 5 1/2 inches. Create an “L” shape by butt jointing the two pieces together along the long edges. Place the shelf between the two sides at a slight angle so that the books will stay in. Attach the shelf to the sides by drilling pilot holes and nailing with 4d finish nails through the holes. Fill all the holes with wood putty, allow to dry and sand flush. Stain the bookshelf a color of your choice.
Step 3: To the letter
To personalize the child’s initials (a hobby shop or a craft store is a good source for the letters), I painted the letters with latex satin paint and attached them to the side of the bookshelf with finish nails and a bead of carpenters glue. To help preserve the bookshelf, apply two coats of a water-based polyurethane. Allow to dry 24 hours before placing books on the shelf they’ll stick, no kidding.
This project is a winner for your children. It will teach them a little about working with tools and woodworking, and what a great way for you to show off your skills. Have fun, and read a book for me.
Matt Fox writes this column with Shari Hiller. They also co-host the Home & Garden Television show “Room by Room.” For more information, visit www.hgtv.com.
Home and Garden

10 top performing new plants for this season

Flower gardens endure hot, dry summers better if you choose these plants
Debunking common garden hacks, quick fixes and myths

Douglas County Master Gardeners invites public to annual native plant sale
How to mulch your garden beds without harming plants