Behind the Lens: The uses of rim light
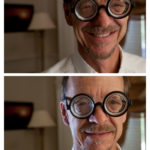
Journal-World chief photographer Mike Yoder models a pair of gag glasses in this demonstration involving the added effect of a rim light. The top photo was taken with Yoder standing about 2 feet from a window in an evenly lit room. The bottom photo, shot in the same location, has a rim light that is left of the camera and pointed to the back and left side of Yoder’s face as he faces the camera.
Nothing highlights a side spike or a mullet, or even a mullet and side spike combo better than a perfectly placed rim light.
Yes, you may remember the rim light phenomenon that filled the pockets of studio portrait photographers in the ’80s. The popular technique provided an endless bag of tricks for the booming business in a decade that will be remembered mostly for its outrageous hairdos.
Now 20-something years later, just as the volume has been turned down on the hair in many respects, so has been the bravado of the rim light. However, just like a can of Aquanet, it can be a subtle and effective accompaniment to a portrait if used in moderation.
There’s plenty to consider and compensate for with such an experiment, but for this one, I recommend simply choosing an evenly lit room in your home that has some window light but not too much. We don’t want the ambient light in the room to be too bright because this will drown out the effect of the rim light.
Next, sit your subject a few feet from the window but not in harsh sunlight so that the window light is at either your left or right hand side when you’re shooting. Then, manually set the exposure on your camera and turn off the on-camera flash.
Now it’s time to introduce the rim light to the scene. The idea behind the technique is to place a strobe or light source somewhere behind your subject or behind and off to the side in a way that helps to create a highlight around the subject’s edges. I think it goes without saying, but I’ll say it anyway, be sure the rim light is out of the camera’s view.
Two variables to consider here are both the power of the rim light and its proximity to the subject. If you don’t have a remote-triggered flash (most people don’t), I recommend a high-powered Maglite or its equivalent. You can have someone hold it, or you can affix it to a stand with a lot of duct tape. Obviously, using a high-intensity discharge spotlight from Cabela’s is going to put out way more light than is needed for most scenarios, and a little $1.50 special from the dollar store just won’t cut it.
When you start to shoot, if the highlighted edges are too bright for your taste, push the light back from your subject a few feet. If they aren’t defined enough, pull it closer.
The desired effect can be a little or big highlight that can define your subject, giving it a little separation from the background.
Arts and Entertainment

Photos: Lawrence begins World Cup festivities with downtown block party

Watkins Museum to open special exhibit detailing how Douglas County celebrated America’s Bicentennial

Go, See, Do: Kaw River Roots Festival, markets and more

Soccer gear honoring Lawrence history’s all-star team is now on sale as part of city’s public art exhibition
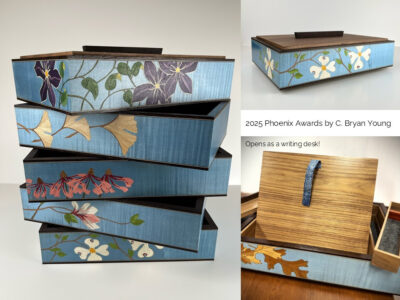
Nominations, call for artists open for Lawrence’s 2026 Phoenix Awards