Homemade for the holidays
Here are 10 fabulous presents – including elegant jewelry, quick and easy fudge, and a special treat for Fido – that little elves can create and personalize for family and friends.
Sugarplum treats
Great for classmates
These delectable sweets are a breeze to whip up and can be made with any hue of candy coating – pick your favorites or stick with holiday classics.
INGREDIENTS
14-ounce bag of candy melts Craft sticks
10-ounce package of marshmallows
Assorted sprinkles, sugars, nuts, flaked coconut and candy decorations
1. Line a cookie sheet with aluminum foil and lightly spray it with nonstick cooking spray.
2. Melt the candy coating according to the package directions.

These delectable sweets are a breeze to whip up and can be made with any hue of candy coating - pick your favorites or stick with holiday classics.
3. Insert a craft stick into each marshmallow. Working one at a time, dip them into the melted candy coating, then into one of the decorations (for easy dipping, put the decorations in shallow bowls), and place them on the cookie sheet.
4. Once all the sugarplums are made, chill them in the freezer for 15 minutes. They can be stored in an airtight container for up to 5 days. If you like, wrap each treat in a cellophane candy bag (available at craft and party stores) tied with a ribbon. Makes 3 dozen.
Fanciful feathered friends
Great for moms, grandmoms and teachers
You can perch these pretty birds in myriad places: put one on the end of a skewer for a plant poke, hang one in a window with a piece of monofilament or place several in a nest for a tabletop centerpiece.
YOU WILL NEED

You can perch these pretty birds in myriad places: put one on the end of a skewer for a plant poke, hang one in a window with a piece of monofilament or place several in a nest for a tabletop centerpiece.
Styrofoam ball, 1 1/2 to 2 1/2 inches in diameter
Bamboo skewer
Glitter paint and paintbrush
Glue dots
Googly eyes
Scissors
Yellow plastic notebook divider tab
Needle-nose pliers
20-gauge craft wire
Feathers
1. Stick the Styrofoam ball on a skewer. Paint the entire ball, then set the skewer in a cup and let it dry overnight.
2. Remove the skewer, then use the glue dots to attach the eyes to the ball.
3. For a beak, cut a small triangle from the notebook tab, as shown. Gently score the ball with the skewer, then insert the beak.
4. Use the pliers to bend the craft wire into feet. Poke the feet and feathers into the ball.
Festive holiday napkins
Great for grandparents, aunts and uncles
Customized for the holiday of your choice, these delightful – and washable – napkins look great whether at the kids’ table or next to Grandma’s best china.
YOU WILL NEED

Customized for the holiday of your choice, these delightful - and washable - napkins look great whether at the kids' table or next to Grandma's best china.
Felt
Scissors
Fabric glue (we used Fabri-tac)
Set of machine-washable napkins
Sequins
Mini pom-poms
1. Cut decorative shapes from the felt, such as a dreidel, Christmas tree, or reindeer (to download our templates, go to FamilyFun.com/magazine).
2. Glue the shapes to a corner of each napkin and decorate them with glued-on sequins and/or mini pom-poms.
HOLLY JOLLY FUDGE
Great for neighbors, teachers and friends
With colorful toppings, these oh-so-tasty morsels are almost irresistible – which means you may have a hard time getting them out the door! Thankfully, our cookie cutter technique will leave plenty of leftovers for nibbling. (They make a terrific topping for ice cream, too!)
INGREDIENTS
3 cups semisweet- or milk-chocolate chips
1 (14-ounce) can sweetened condensed milk
1/8 teaspoon salt
1 teaspoon vanilla extract
Assorted sprinkles, sugars and candy decorations
1. Place the chocolate chips in a 2-quart bowl and microwave for 1 minute, then stir them with a wooden spoon. If the chips are not completely melted, microwave them again for 30 seconds, then stir until they’re smooth.
2. Stir in the condensed milk, salt and vanilla extract.
3. Line a 9-inch square pan with aluminum foil, extending it about 2 inches beyond each side. (This makes it easy to remove the fudge later.) Lightly spray the foil with nonstick cooking spray.
4. Spread the mixture evenly in the pan.
5. Chill the candy until firm, about 30 minutes in the freezer or one house in the refrigerator.
6. Life the foil from the pan and place it on a flat work area. Use 1-inch cookie cutters to cut out the fudge, the lightly press decorations onto each piece. Makes about 50 pieces.
FUN FELT PENS
Great for siblings, cousins and friends
These cute, friendly-faced pens are so simple to make, you can create a zoo in an afternoon. Just be sure to keep one for yourself, and use it to write those postholiday thank-you notes!
1. Cut a strip of felt.
2. With an adult’s help, run a thin bead of hot glue along one edge, roll up the pen in the felt and glue the other edge.
3. Once that’s dry, glue on googly eyes and felt details, such as wings and ears.
BEAUTIFUL BEADED RINGS
Great for aunts, grandmothers and friends
These glamorous rings look so good, the recipients might not even guess they’re homemade! You can customize them with your favorite beads, and an elastic band means they’ll fit any finger (or toe!).
YOU WILL NEED
Clear elastic beading cord
Scissors
Beads
1. Cut a piece of elastic. To make the beading easier, we started with a 10-inch length for an adult’s ring finger and a 6-inch length for a child’s pinkie.
2. Thread the bead or beads onto the elastic (for our larger ring, we used 18).
3. Using a helper’s finger as a guide, knot together the ends. Finally, trim the ends and slide the knot into the middle of a bead so it’s hidden from sight.
HOT CHOCOLATE CONES
Great for babysitters, teachers and neighbors
A perennial winter favorite, hot cocoa with all the trimmings (mini marshmallows, chocolate chips and a cherry-red gumdrop) sports an even sweeter look packaged as a cone. Be sure to add a tag letting your recipients know the cone contains enough for four servings.
YOU WILL NEED
3/4 cup cocoa mix
2 (6- by 12-inch) cone-shaped cellophane bags (available at party stores)
2 clear rubber bands (we used ponytail holders)
Scissors
1/4 cup mini chocolate chips
3/4 cup mini marshmallows
1 large red gumdrop
1. Pour the cocoa mix into one of the bags. Close the bag with a clear rubber band, then trim the end of the bag 1 inch above the band.
2. Place the cocoa-filled bag into the second bag and flatten its top so the end doesn’t stick up.
3. Layer the chocolate chips and the marshmallows, then top with the gumdrop. Secure the bag with the other rubber band.
KIDS’ ART WINDOW CHARMS
Great for moms and grandparents
Even the snowiest of winter days looks cheerier with these brightly colored charms hanging in the window. You can draw geometric designs, your cat, yourself – whatever strikes your fancy.
YOU WILL NEED
3-inch round lid
Shrinky Dink Frosted Ruff ‘N Ready sheets
Permanent markers
Scissors
Hole punch
Monofilament or clear elastic beading cord
Beads
1. For each charm, trace the lid onto a sheet of Shrinky Dink. Then draw designs in the circles with the markers.
2. Cut out the charms, then punch a hole in the top and bottom of each.
3. Follow the package directions to bake the charms.
4. Cut a length of the monofilament (ours was 20 inches) and knot one end (this will be the bottom). Add 2 beads, then string the monofilament through the holes of a charm. Add another bead, then another charm, and so on, until all the charms have been strung. Add a final bead, then tie the end into a loop for hanging.
PERSONALIZED MEMO PAD
Great for dads, grandmothers and anyone who needs reminders!
With a little help from your parents, you can turn a simple photo frame into a made-to-order message center that showcases your artwork or photo. We designed ours for Dad to take to the office and for Grandma to use by her phone.
YOU WILL NEED
White glue
Paintbrush
Wooden picture frame
Decorative paper (such as scrapbooking paper)
Craft knife
Child’s artwork or photo
Stickers, beads or other embellishments
Thumbtack
Ribbon or shoelace
Pencil
Post-it note pad
1. Thin some white glue with water and paint it onto the front of the frame. Then place the paper on the glue and smooth it with your hand.
2. When the glue is dry, use the craft knife (a parent’s job) to trim the paper flush with the edges of the frame.
3. Place a photo or a piece of artwork in the frame, then add embellishments to the front, such as stickers, painted flowers and beads. For one frame, we threaded alphabet beads on elastic beading cord and used thumbtacks to attach the cord to the back.
4. Use a thumbtack to attach a ribbon or shoelace to the side of the frame, and tie a pencil to the other end.
5. Glue the back of the pad to the frame, or use a Super-sticky Post-it pad, which doesn’t need glue, and write a message on the top note.
DOGGIE BARK
Great for man’s best friend
Make a special treat for that other member of the family, plus any other dogs in her life. (We hear that reindeer are also partial to this bark!) Be sure to use carob chips – chocolate is harmful to canines.
INGREDIENTS
4 cups carob chips
1/2 cup creamy peanut butter
1/2 cup dry-roasted peanuts or chopped walnuts
1/4 teaspoon cinnamon
1. In a bowl, melt the carob chips in the microwave for 30 seconds. Stir them with a wooden spoon, then microwave for 30 seconds more.
2. Stir in the peanut butter and microwave for another 15 seconds. Stir the ingredients again to combine.
3. Add the nuts and the cinnamon, then stir the mixture to coat the nuts.
4. Line an edged cookie sheet with aluminum foil and lightly spray the foil with nonstick cooking spray. Pour the mixture onto the foil and chill it for 15 minutes in the freezer or 30 minutes in the refrigerator.
5. Remove the bark and break it into roughly 1- by 2-inch pieces. Store it in an airtight container for up to 2 weeks. Makes about 70 pieces.
Food
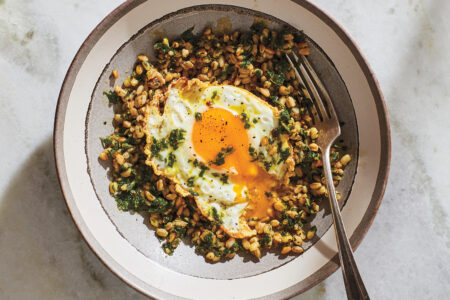
David Tamarkin’s recipe for Greens, Grains and Fried Egg works for any meal
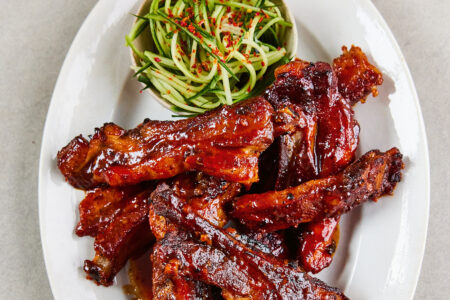
Slow-cooked, sticky-glazed pork ribs go with cucumber slaw in Sam Way’s recipe