Fix-It Chick: Strip, crimp and cut wire with a multi-tool
Use a multi-tool to strip, cut and crimp electrical wires.
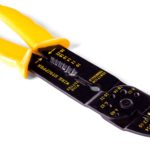
Stripping the plastic coating off of electrical wires is easy with a gauged wire stripper, but an electrical multi-tool stripper and crimper offers a whole host of other options, too.
Step 1: A gauged wire stripper has a series of bladed holes specifically sized for standard wire diameters and are usually labeled as such. Most strippers will remove the plastic coating from stranded and solid 10 to 22 gauge wires.
Place the wire in the notch that corresponds with its size. Allow a quarter inch or more of the wire to protrude past the stripping portion of the tool.
Step 2: Squeeze the handles of the tool together and twist the tool back and forth around the wire to cut through the plastic coating.
Step 3: Hold the handles closed and pull the tool up and off the end of the wire. The plastic coating should slide off, leaving the bare wire exposed.
Step 4: If the solid wire appears nicked or the stranded wire appears to be missing several strands, cut the end of the wire off and try again. The angled wire cutting blade can usually cut up to 10 gauge wire or cable.
Pull the tool handles apart to open the jaws of the cutter, place the wire into the opening and press the handles closed to cut through the wire.
Step 5: A multi-tool can also be used to crimp solderless connectors and 7 – 8 mm automotive ignition terminals. Use the curvy notches of the tool to crimp non-insulated connectors and use the elliptical openings to crimp insulated connectors. Slip the bare wire end into the connector and place the connector between the crimping blades. Openings for insulated connectors are often marked with a yellow, blue or red dot that matches the color coded size of the connector they are for. Squeeze the handles together to crimp the connector onto the wire.
Step 6: The most magical feature of a multi-tool crimper and stripper are the threaded screw holes found in the middle of the tool. These holes help identify screw sizes and also cut non-hardened screws.
Open the tool handles until the underside holes are aligned with the threaded holes. Thread the screw into the correct hole and squeeze the handles together to cut the screw. When the screw is unthreaded from the hole its threads will be cleaned, aligned and ready to use.