Behind the Lens: Copying methods preserve family photographs
If you don’t have a print or film scanner, a digital point-and-shoot camera can give you a portable copying device to digitize old photographs.
Suggested print sizes compared with a camera’s megapixels
4mp+ = 4×6
5mp+ = 5×7
7mp+ = 8×10
10mp+ = 11×14
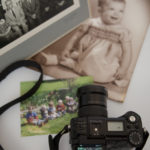
If you’re like most families who have enjoyed photography as a hobby during the last 50 years, you probably have a collection of picture albums full of 4×6-inch color prints. If you’re lucky, you even have some old black-and-white prints passed down from your parents or grandparents.
I’ll show you a simple and portable method to digitize those images so you can get them on your computer, make copies for family members or preserve for future use. While film and print scanners do the best job of copying photographs, using a digital point-and-shoot camera can be a good option.
For a camera, I recommend any digital camera with at least a 4-megapixel resolution. A 4mp camera should be good enough to produce new 4×6-inch copies of any print you choose to photograph. If you have 5×7 or larger prints to copy and want to make enlargements of equal size refer to the table on the left. The first column is a camera’s megapixel rating, the second is the recommended maximum output or copy print size.
As an example, I have an old 11×14 print of my great-great grandmother. If I want to print similar sized reproductions of that image, I would re-shoot the photograph with a minimum 10mp camera to ensure a good 11×14 print. If I only intend to make 4×6 prints from that original 11×14 print I would be fine copying the larger print with a 4mp camera.
I prefer to stand up for copy work, so using a wall or a sturdy piece of something like foam core board works well. I attach the print to this surface using poster glue and place perpendicular to me and the camera. Poster glue won’t harm prints, and the glue pieces can remain on the board or wall as I remove and add new prints. To flatten prints, I place glue in each corner of the print. If you want to avoid the glue you can use straight pins.
I suggest doing this copy work in light shade. Areas indoors also work where there is soft, even light. To help reduce reflections off of glossy prints, I recommend that the area opposite the print — behind you and the camera — be dark or in shade also. Dark areas of glossy prints are like mirrors and will reflect light. Having a dark area opposite the print will reduce reflections. Your camera setting should be on the highest resolution, the flash should be in the off position and your white balance should be set for shade or daylight. If you know how to adjust your ISO — the cameras light sensitivity setting — set it to 100 or 200. By using the live monitor screen on the back of your camera, you should be able to fill the entire screen with the print using most zoom lenses. Your camera’s automatic metering should do fine for the exposure, but make sure you are not shooting at shutter speeds below 1/60 second or you might blur your image because of camera shake. If you have a tripod I would recommend using it. Image stabilization on some cameras will help also.
From this point you can easily download your new digital copies to your computer where they can be copied again, burned to CDs or e-mailed to family and friends.
Arts and Entertainment

Book sale, wine tasting, Lawrence City Band’s summer finale and more events

Author Nico Lang, who’s visiting the Raven this week, wants to show how ordinary transgender teens’ lives are

July 4 celebrations, cinema, berry picking, outdoor music and more events

Final Friday, Free State Festival, music, art and more events
