Scary good fun: How to throw the perfect Halloween party

Beth Jackson Klosterboer created these Sweet Ghost Crisps by using eggroll wrappers, a padded muffin tin and an edible food marker.

Topeka's Cindy Hopper, co-owner of Sweet!, 717 Mass., has plenty of Halloween ideas on her blog, www.SkipToMyLou.org. Those ideas include this candy corn favor, the pattern for which can be downloaded at http://www.skiptomylou.org/2009/10/27/candy-corn-cone-favors/.

Blogger and author Beth Jackson Klosterboer designed this Portrait of a Monster spinach-artichoke dip for a party with a Monster

Beth Jackson Klosterboer's Black Cat Cheese Ball from her blog, www.hungryhappenings.com.

Hungry
Halloween can be scary fun with just the right people.
If you’re planning to throw a party, we’ve got all you need to do it right. We talked with Ohio’s Beth Jackson Klosterboer, author of “Hungry Halloween” and the force behind the HungryHappenings.com blog, and Topeka’s Cindy Hopper, who blogs about food and crafts at SkipToMyLou.org and co-owns Sweet!, 717 Mass. Both are big-time party hosts with creativity to spare.
Check out their tips and recipes to make your Halloween gathering so good it’s frightful.
Don’t make it all sweet.
Hopper says that it’s important to have a little something to help balance out all the sugary treats that are bound to come to the table. She says she’s planning on making Cincinnati chili (chili over noodles) for her party, just to give guests a hearty option to help with the blood sugar spikes.
Klosterboer has done hamburgers shaped like hands (handburgers, get it?), spinach-artichoke dip and various spooky cheese balls to help add in a bit of the hearty and the savory.
Encourage others’ creativity.
If you do decide to allow guests to bring side dishes, offer a small prize for the most inventive dish says Klosterboer. She normally makes most everything herself, but the year “Hungry Halloween” came out, she was swamped, so she decided to make her party a game.
“I offered a prize, I said, if anybody brings a monster-themed dish, the best dish wins a prize,” Klosterboer says. “And so, it got people excited about bringing something rather than just running to the grocery store and grabbing something.”
It’s in the details.
It doesn’t take much time, but it’s easy to do little crafty projects to dress up everything from cupcakes to your party spread says Hopper, who has several ideas up on Skip To My Lou.
“Sometimes, it’s just those little added details to the party that make it more festive and memorable,” she says, suggesting cupcake tags or little decorations. “Just don’t overlook the small things you can do that just take a few minutes (and) actually add a little extra to a party.”
Dress up store-bought gifts.
If you’re a guest who’s not a chef, it’s OK to pick up pre-made cookies or cupcakes from the grocery store. Just don’t give them to your hostess in the plastic box, says Hopper. She recommends taking the time to at least transfer the store-bought items from their packaging to a platter. That way, what you deliver will look nice on your host’s table, and keep her from hunting for a spare platter at the last minute.
Similarly, if you’re a host who isn’t a baker and you’re planning to go with store-bought, consider dressing things up by taking it out of the plastic. Who knows? You might even trick some guests with your treats.
Check the time.
You’ve got several options for party dates and times thanks to Halloween falling on a Monday this year. Klosterboer says that regardless of the day, figure out the best possible time by using your guests as a guide.
If it’s a kid-only party, she recommends having it run from early afternoon to late afternoon — 1 p.m. to 4 p.m. or 2 p.m. to 5 p.m. — so that you’re not responsible for giving the kids a full meal.
If it’s an adult-only party, resist the urge to throw a late party and aim instead for 6 p.m. or 6:30. That way there’s less of a chance of your guests eating dinner beforehand and only nibbling at your treats.
If it’s a family party, with both kids and parents, start around 5 p.m, she says. She says she’s found families generally want to be home by 10 p.m. and starting early gives them both the chance to eat and mingle.
Consider favors.
Hopper says she loves giving her guests a little something to take with them. And not just a fun-size candy.
“I don’t think people should feel like they have to send something home, necessarily. But it can be kind of fun,” Hopper says, suggesting a small bucket of apples with a package of caramel sheets and sticks. “A lot of times, I’ll send something for the next morning, like muffins, or something like that.”
Recipes
Sweet Ghost Crisps
12 egg roll wrappers
Black edible food marker
Egg wash (1 egg mixed with 1 teaspoon water)
1/2-2/3 cup granulated sugar
Preheat oven to 400 degrees.
Use the black food coloring marker to draw faces onto each egg roll wrapper.
Brush egg wash over egg roll wrapper, but don’t brush directly over the face or the edible ink may smear. Sprinkle a generous amount of sugar over each wrapper.
Roll pieces of parchment paper or foil up into golf ball size balls. Set a muffin tin upside down. Place balls on top of muffin cups, leaving plenty of room in between each for the egg roll wrappers to drape (I only placed 4 ghosts on a 12 cup muffin tin, to give them plenty of room.). Drape egg roll wrappers over the paper balls.
Bake for 5 to 6 minutes until golden brown. Serves 12.
— Recipe by Beth Jackson Klosterboer, from her blog, www.hungryhappenings.com.
Black Cat Cheese Ball
8 ounces softened cream cheese, divided
4 ounces shredded Havarti cheese
4 ounces shredded Gruyere cheese
3 roasted red peppers, drained, patted dry and seeds removed
1 small clove of garlic, minced
2 ounces blue corn tortilla chips
1 black olive
Crackers
In food processor, combine 7 ounces of the cream cheese, plus the Havarti cheese, Gruyere cheese, roasted red peppers and garlic. Pulse until creamy and smooth. You will need 1 heaping teaspoon of this cheese for the cat’s nose. Wrap the teaspoon of cheese in plastic wrap and refrigerate until needed. Place the remaining cheese mixture on a large piece of plastic wrap. Use the plastic wrap to mold the cheese mixture into a flattened ball (the cat’s head).
Reserve 2 whole blue corn tortilla chips for the cat’s ears. Place remaining chips in the (cleaned) food processor bowl and pulse to fine crumbs. Pour onto a large piece of plastic wrap. Set cheese ball round-side down on the crumbs. Use the plastic wrap to press the crumbs all over the surface of the cheese ball. Flip over and set cheese ball, crumb-side up, on a serving platter.
Put remaining 1 ounce cream cheese into pastry bag or zip-top bag. Snip off the tip of the bag. Pipe three whiskers onto cat’s face. Remove the reserved cheese mixture from the refrigerator and mold it into a triangular shape for the nose; place in the middle of the cat’s face (on top of and in the middle of the whiskers).
To create the eyes, I suggest you scoop out the crushed tortilla chips and a bit of the cheese ball in two circles above the nose. Pipe cream cheese into these holes. Smooth it out into a nice circle. Cut olive in half and lay on top of the eyes for pupils.
Press the two reserved blue corn tortilla chips into top of head for ears.
Refrigerate until needed. Let sit at room temperature for at least 30 minutes before serving with crackers. Serves 12 to 18.
— Recipe by Beth Jackson Klosterboer from www.hungryhappenings.com.
Portrait of a Monster
Artichoke Dip Layer:
2 (14-ounce) jars marinated artichokes
5 cloves roasted garlic
6 ounces cream cheese, softened
1/2 cup mayonnaise
1 cup freshly grated Parmesan cheese (use Parmigiano-Reggiano for the best flavor)
Spinach Dip Layer:
10 ounces frozen spinach, thawed
1 can water chestnuts
2 ounces cream cheese, softened
3/4 cup sour cream
1/2 cup mayonnaise
2 tablespoons grated Parmesan cheese
5 cloves roasted garlic
1/2 teaspoon salt
1/2 teaspoon lemon juice
1/2 teaspoon onion powder
2 ounces blue tortilla chips
*To roast garlic: Drizzle some olive oil over peeled garlic cloves. Loosely wrap in foil and roast in a 375-degree oven for 45 minutes. Remove from foil and let cool before using in your dips.
To create the monster stencil: (Go to http://www.hungryhappenings.com/2011/09/recipe-excerpted-from-my-cookbook.html) Print the monster template on an 8 1/2-inch by 11-inch paper. Set the printed template on a cutting board and lay a clear stencil sheet on top (available at hobby stores). Use a hobby knife or stencil cutter to cut out the black areas of the image.
To make the artichoke dip: Drain the artichokes and squeeze them dry. Pour artichokes, roasted garlic cloves, cream cheese, mayonnaise and Parmesan cheese into the bowl of a food processor. Pulse until mixture is well combined. Spoon into a 9-inch by 13-inch baking pan.
To make the spinach dip: Drain spinach by squeezing it in several layers of paper towels. Place spinach in the food processor bowl (you don’t even have to clean the bowl.) Add water chestnuts, cream cheese, sour cream, mayonnaise, Parmesan cheese, roasted garlic, salt, lemon juice, and onion powder. Pulse until creamy and smooth.
To create portrait of a monster dip: Smooth out the artichoke dip that’s already spooned into a 9 by 13 baking dish using an offset spatula or large spoon. Lay stencil on top of the artichoke dip. Use a sharp knife to trace around the outline of the monster’s head. Remove the stencil and wipe it clean.
Spoon the spinach dip into a disposable pastry bag or heavy duty zip top bag and cut off tip of bag. Pipe the spinach dip over the artichoke dip within the lines left by the knife. Fill in the monster’s head with spinach dip, so his entire head is green.
Pour blue corn tortilla chips into a clean bowl in the food processor. Pulse to fine crumbs. Lay stencil over top of spinach dip. Sprinkle ground tortilla chips over cut out areas on stencil. Clean off excess crumbs using a pastry brush. Gently lift off stencil.
Refrigerate for at least 30 minutes or up to 2 days. Serve cold. You can also heat the dip up in the oven if you prefer, but I really like it cold and it will taste better throughout the party if it is served cold.
— Recipe from Beth Jackson Klosterboer, author of “Hungry Halloween.”
The Best Pumpkin Bread
3 1/2 cups flour
1 1/2 teaspoon salt
3 cups sugar
2 teaspoon baking soda
1 tablespoon cinnamon
4 eggs
1 15-ounce can pumpkin
1 cup oil
3/4 cup water
Stir flour, baking soda, salt, cinnamon and sugar together. Add oil, eggs, water and pumpkin. Bake at 350 degrees 35 to 45 minutes (will depend on size of bread pans or muffin size) or until tests done.
— Recipe by Cindy Hopper from www.SkipToMyLou.org.
Food
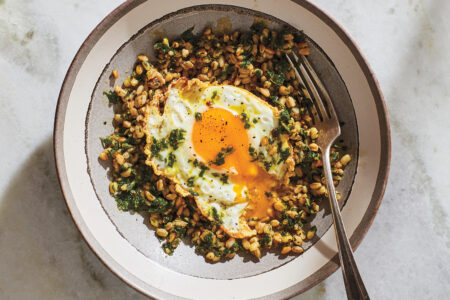
David Tamarkin’s recipe for Greens, Grains and Fried Egg works for any meal
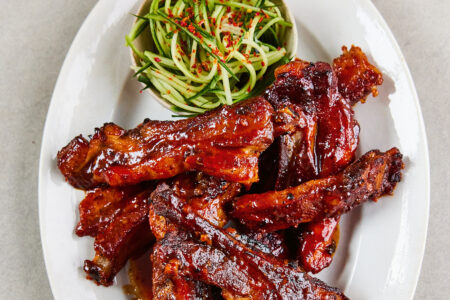
Slow-cooked, sticky-glazed pork ribs go with cucumber slaw in Sam Way’s recipe